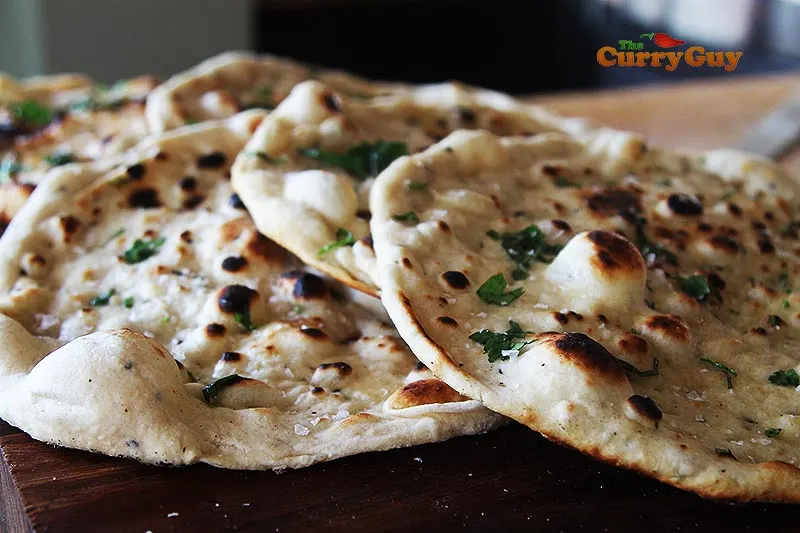
If you want to make restaurant quality naans at home, this instant naan recipe will get you those results. Using self-raising flour is the trick and it’s how naans are prepared at most restaurants. I do have a lot of delicious naan and chapati recipes for you to try here on the blog but this is the quickest!
These naans are amazing served as a side for curry house style curries and other curries. They are also delicious used as wraps for chicken tikka and lamb tikka with a good homemade chutney or raita.

About This Curry House Recipe
No yeast is required to make this instant naan recipe and you can make your naans in about 30 minutes. At busy curry houses, it is nearly impossible to know just how many naans they might need every evening.
There is a lot of profit in naans so the chefs don’t want to run out of dough. There isn’t the time to prepare more authentic recipes using dry yeast and/or yoghurt so they make the dough just like this recipe.
These would normally be cooked in a tandoor oven but you can get equally good results using a pan!

Ingredients
Fresh ingredients are key to getting the best flavour from this curry house naan recipe. You’ll find the ingredients listed below, while the precise amounts are provided in the recipe card at the end of the page. In the video I make plain naans, garlic naans and chilli naans so there are more ingredients in the photo than you need to make plain naans.

See recipe card for quantities.
- Self-raising flour, sifted plus extra as needed
- Warm full-fat (whole) milk
- Water
- Caster (superfine) sugar
- Salt
- Egg, lightly beaten
- Nigella seeds (black onion seeds) - optional
- 35ml (1/8 cup) rapeseed (canola) oil
- Ghee or butter, for brushing
Step by step photos
Below, you’ll see step-by-step photographs to guide you through the plain naan recipe cooked in a pan. Be sure to watch the video for other ideas. At the bottom of the page, you’ll also find the full recipe card, which includes the complete list of ingredients and written instructions in an easy, printable format.

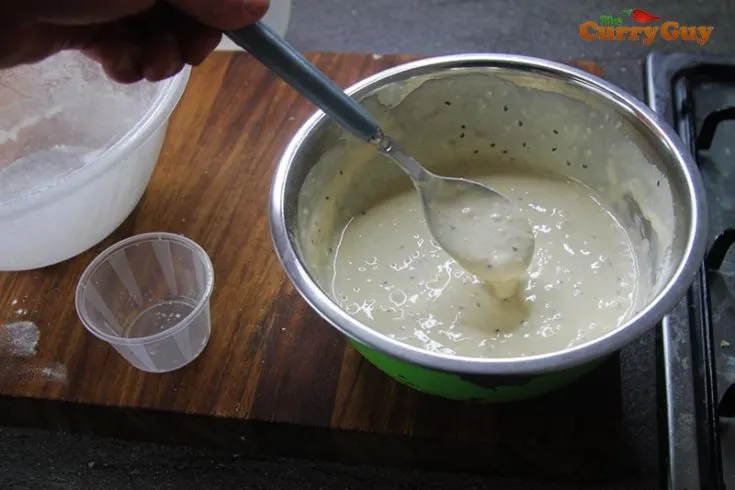
- Step 1: Pour the milk and water into a large mixing bowl. Add the eggs, salt, sugar and nigella seeds, if using and whisk well.
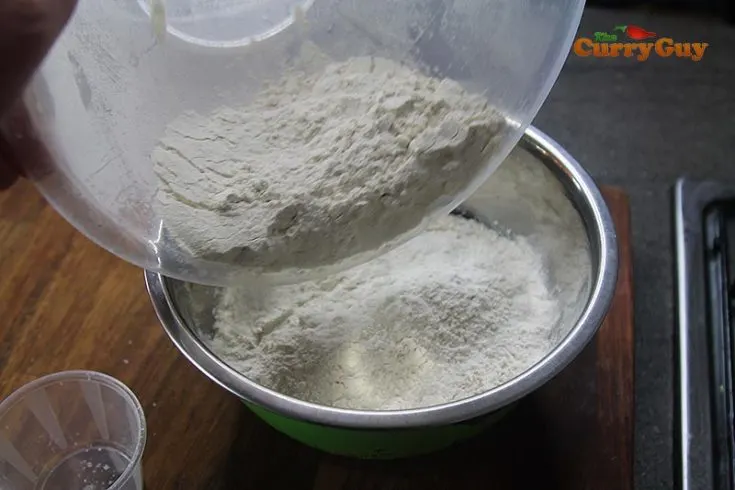
- Step 2: Start adding the flour and stirring.
- Step 3: After adding the first lot of flour, your dough will be soupy and wet. Continue adding flour until you have a soft dough that is sticky but not sticking to your hands.

- Step 4: This dough is still very soft and sticky. If you have time, leave it, covered with a towel for a couple of hours or just go straight to cooking your naans. Letting the dough rest will make it easier to work. You can also leave it overnight for a stronger flavour.

- Step 5: Kneading the dough is optional but when at home, it will make superior results to using the dough immediately. Five minutes of kneading on a floured surface will be good.

- Step 6: Divide the dough into about 8 to 10 balls. The size of the balls is really down to you. If you have a large pan and want a couple of giant naans, go for it.

- Step 7: Roll out your naans leaving them about 1/8 inch thick. On one side rub water all over the surface. On the other, rub it with oil or melted ghee. Then stap it, water side down into a hot pan.

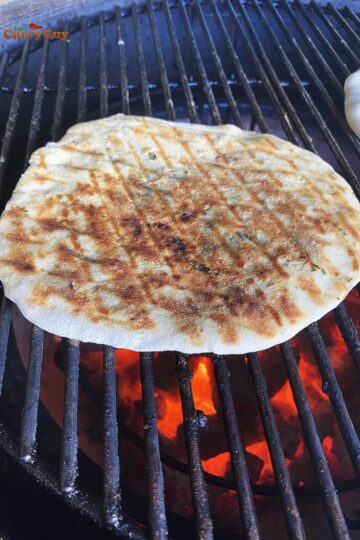
- Step 8: As the naan cooks, bubbles will form on top. When you are happy with how the naan looks, it's time to turn your pan toward the flame. If you don't have a gas stove, you can just flip it over in the pan but you will lose some of the bubbles. It will still be amazing!

- Step 9: Toast the bubbles to your liking.

- Step 10: Continue with the remaining dough or freeze it in balls for later.
Variations
There are hundreds of popular variations. Here are a few.
- Garlic: Roll slivered garlic into the dough (Shown in the video)
- Chilli Naan: Roll chopped chillies into the naan (Shown in video)
Storage
Fridge: Your pan cooked naans are best eaten fresh out of the pan. You can keep them wrapped tightly in the fridge for up to 3 days. Reheat in the microwave or in your oven. Air fryers are great for reheating too.
Freezer: If freezing, I recommend freezing the dough balls before cooking. They will freeze well for up to 3 months.
Special instructions if cooking over gas...
Cooking over gas will get you the best results. That or an open flame on a barbecue. To do so, use a pan that is not non-stick.
Lightly wet the underside of your naan and then slap it into the pan. The naan will stick securely to the pan. Doing this will allow you to be able to turn the naan toward the flame to brown it.
Then just use a metal spatula to pry the naan off which should come off easily once cooked.
Top Tip
If you are not in a rush, prepare the dough balls or just the dough a day or two ahead of cooking. The flavours will develop and your instant naans will be even better.
FAQ
Yes! You can freeze it wet or roll it into balls with more flour. Then place in the freezer, covered tightly. This instant naan recipe can be frozen for up to 3 months.
Yes! No problem at all with a bit of maths. In the video I upscaled the recipe to serve more people.
That's a personal thing! You might like these better because this is how they are made at curry houses. The flavour and texture will be familiar to you if you order naans when you go out.
Related
Looking for other recipes like this? Try these:


Pairing
Your homemade naans will go great with all of these...


Have you tried this Stove top naan recipe?
If yes, please give it a star rating in the recipe card below and leave a comment. I love receiving your feedback and I’m sure other readers of my blog do too. Thank you.
If you are not already doing so, please follow The Curry Guy on YouTube, Instagram and Facebook for all our latest recipes.
Naan Recipe - Instant and Delicious Stovetop Naans
Ingredients
- 250g (2 cups) self-raising (self-rising) flour, sifted plus extra as needed
- 125ml (1/2 cup) warm full-fat (whole) milk
- 110ml approx. (scant 1/2 cup) water
- 1 1/2 tbsp caster (superfine) sugar
- 1 tsp salt
- 1 egg, lightly beaten
- 1 1/2 tsp nigella seeds (black onion seeds)
- 35ml (1/8 cup) rapeseed (canola) oil
- Ghee or butter, for brushing
Instructions
- Pour the milk and water into a large mixing bowl. Add the eggs, salt, sugar and nigella seeds and whisk well.
- Now start pouring in the flour, whisking as you do. Once you’ve added all the flour, it will still look very soupy and far too wet to work into dough balls.
- I recommend covering the dough at this time with a wet cloth and letting it sit for at least 3 hours or overnight for best results. That said, you could just jump right into finishing the recipe at this stage.
- When ready to cook your naans, slowly start adding more self-rising flour. The idea here is to add just enough flour so that the dough is workable. For reference, I ended up adding about 7 handfuls of flour.
- It should be very soft and slightly sticky but not so sticky that it sticks to your hands. If it does, dust with a little bit more flour until you can easily divide and form the dough into six spongy dough balls.
- Once your dough balls are formed, you could let them sit, covered for about 30 minutes but again, you could push forward and make your naans immediately.
- As the dough is so soft, you shouldn’t need a rolling pin. Dip you fingers in the oil and this start patting the first dough ball to flatten it. Continue slapping it until it is thin and flat. Repeat with the remaining dough balls.
- Dust off any excess flour and then lightly brush the tops of the naans with oil.
- Heat a dry frying pan over a medium–high heat and slap the first naan into it, oil side up. As it cooks, bubbles will form on the top and it will begin to look like a
real naan! - If you have a blow torch, use it to brown and blacken the bubbles. If you are cooking on gas, and have a cast irong pan, you could also do as I did in the picture above and turn the naan toward the flame. Another option would be to just flip it over. This will pop a lot of the bubbles but the naan will still be delicious. Brush with a little melted ghee to serve.
- Keep warm and repeat with the remaining naans.
Nutrition Information:
Yield:
8Serving Size:
1Amount Per Serving: Calories: 139Total Fat: 3gSaturated Fat: 0gUnsaturated Fat: 2gCholesterol: 2mgSodium: 298mgCarbohydrates: 30gFiber: 1gSugar: 22gProtein: 2g


David says
So easy to make and so delicious, I couldn't get Nigella seeds so used 1:1 dried oregano. So much nicer than supermarket naan.
Dan Toombs says
Great to hear David. Thank you!
Dan
Hannah F says
We just stumbled upon your site and cant wait to try your recipes!!! We will be trying this one ASAP!
Dan Toombs says
Hi Hannah
That's great to hear!
Thanks
Dan
Daz says
Hi Dan,
Could we use semi-skimmed milk or does it have to be whole milk?
Thanks
Dan Toombs says
Hi Daz
I have found that for some reason semi skimmed milk works best.
Thanks
Dan
Daz says
Ok brilliant, thanks for the reply Dan
steph l says
Well I made them in readiness for tea, then had to make a second batch because I turned my back and they ate them all !!
Dan Toombs says
Hi Steph
Great to know the recipe was such a success!
Thanks
Dan
Missy Dee says
Wow thank you for this recipe. Been looking for a restaurant style one. If I want to make this into a ‘garlic naan’ what do you recommend? Add fresh garlic in it or on it? And coriander in or on?
Dan Toombs says
Hi
Yes, you could certainly add garlic and/or coriander to make the recipe your own.
Thanks for your feedback.
Dan
Gill says
Hi Dan
Can you freeze these as slightly 2 many for 2 people, was going to half the mixture but not sure how to half an egg so thinking maybe freezing is better, thanks
Dan Toombs says
Hi Gill
Yes, you can freeze the raw dough.
Thanks
Dan
Neil Stoker says
Fab recipe, easy and quick. Had a take away curry with friends last night and I made these up and they were very well received. Going to try converting into Peshawari next time.
Thanks so much ... Love the recipes
Neil
Dan Toombs says
Hi Neil
Great to hear.
Thanks, Dan
Nigel Caddick says
Hi Dan,
Does it have to be Canola, Rapeseed oil? We have several bottles of various oils in the cupboard you see, or is the oil purely for your fingers so that the dough doesn't stick? Cheers
Dan Toombs says
Hi Nigel
Yes, just use whatever cooking oil you have to hand.
Thanks
Dan
Kes Devine says
Hi, Great Naans just cooked and demolished! Did i miss read something as i couldn't see where to use the Rapeseed oil?
Many Thanks
Kes
Dan Toombs says
Hi
The oil is just to dip your hands in before rolling it out so the dough doesn't stick to your hands.
Thanks
Dan
Rob Ironmonger says
Hi Dan, Does the mixture require kneading or do you just mix it in the bowl before forming in to individual balls?
Dan Toombs says
You can knead it a little if you have time but it is not crucial.
Thanks
Dan
Thuy Hoang says
Hi Dan,
I love your posts! I noticed you have three fab naan recipes and was just wondering which one is your favourite. I am making a Parsi curry, Salli Boti this weekend and would like to make naans to accompany lamb curry. I have the ingredients you listed for all three recipes but sadly do not own a tandor. I was thinking of making plain and garlic naans and would be very grateful for your advice regarding which recipe to try first. I would like the naans to be as close to the ones serves at the restaurants as possible. Do you by any chance have a recipe for onion bhajis that you could share please?
Many thanks,
Thuy
Dan Toombs says
Hi
Here is my onion bhaji recipe
https://greatcurryrecipes.net/2012/02/10/onion-bhajis/
I would make the stove top naans as they are very easy and work well.
Thanks
Dan
Jenny Wood says
I tried these last night and must have done something wrong. The taste was good, but no bubbles when I cooked them and they were certainly not light and fluffy. I made the batter and left it for at least 3 hours, the only thing I can think is that I didn't use enough flour at 'phase 2' because the first ones were a bit sticky, but i added more flour for the last few
I am interested in how you flame the top side once it bubbles, my naans had no cohesion with the pan and would slip out
I have done loads of your recipes and they have always been successful until this ...
Dan Toombs says
Hi Jenny
I am not really sure what you did wrong, the recipe seems to work for most people. Maybe the pan wasn't hot enough?
The only way to brown the top is to turn it over which will flatten some of the bubbles or use a blow torch if you have one. You could also put it under the grill for a couple of minutes.
Thanks
Dan
Alex says
Hello, I seem to be having issues with this recipe and just non-yeast recipes. I tried yours and also latif inspired on YouTube, both turned out similar. Not so soft but more flat bread texture, the bubbles are extremely small everywhere. I tried much hotter than usual and I know tandoor ovens are extremely hot but this just seems to burn the bottom if I go too hot and still give the same result of small bubbles and not so soft. I am using a tawa pan which works fine for my yeast recipes where it makes bigger bubbles and the naan is nice and soft, wet one side then turn it over on the gas to cook the other side.
Just really wanting a recipe that I can do quickly without waiting but any self raising non-yeast recipe seems to really struggle!
Dan Toombs says
Thanks for getting in touch. The no yeast method is perfect for thin naans with small bubbles. If you want larger bubbles, you should use my yeast method. That said, you should get better results if you want larger bubbles but rolling the naans thicker. You shouldn't cook on as high a flame when doing this as it needs to cook through without burning the bottom. Once the bubbles have formed to your liking, check the bottom. If it is not burning, turn up the heat to high and the bubbles will increase in size even more. Watch it though. You need to do this in a pan that is not non stick. Flip the pan over to darken the top over the gas or use a blow torch. Hope this helps.
Mike says
Hi Dan,
Someone else asked about making these into garlic and coriander naans - but when/where would you add the garlic? Would you add finely chopped or minced (?) garlic Into the mix when making the dough or sprinkle it on while cooking the pan or would you just make a garlic butter and spread it on while cooking in the pan or even afterwards? I'm assuming the coriander would go on at the last minute as with other recipes but just not sure about how to make them nice and garlicky like the restaurant ones.
Maybe you could update the recipe to instruct people on that option? I think most of us curry lovers prefer the garlic ones!
Dan Toombs says
Thanks for your message. I heat up ghee and add a few teaspoons of minced garlic and pour it over the naans once they are cooked, that works really well. You could sprinkle some coriander on top at this stage too.
Dan
Matt says
Hi Dan
Little confused by some differences in this vs the recipe in the bible.
Both say they serve 6 (make 6 naans) but this website recipe has half the ingredients as the book version. Does that mean the book makes 12 or this makes 3?
Also, do these stick to the pan without using water on the bottom? Whenever I've cooked pan naans previously, recipes have said to stick them with water. Would these still stick so I can turn the pan over?
Thanks
Dan Toombs says
Hi Matt
The naans in the Bible are a big bigger so you can make 6 from my web site recipe but make them smaller.
As long as you follow my recipe and get the pan hot enough they should not stick to the pan.
Thanks
Dan
Ben says
Hi Dan,
Just attempted this for the first time, but my whisked mix ended up very very tough. Added a full cup more of milk (misreading thinking I’d missed off when looking at cups of flour). The new mix now looks like your but must be wrong as it’s got triple milk 🙈
Are the written amounts the same as what you did in the video?
Not sure where I went wrong at first
Dan Toombs says
You just need to add enough milk to make it the right consistency as my video on Facebook and Utube. The amount of liquid to add varies depending on lots of factors but it sounds like you got there in the end.
Thanks
Dan
Chrissy says
I didn't know what to do with the oil so i put it in with the rest of the ingredients. Didn't realise it was just for your hands. They still came out bubbly and fab!
Dan Toombs says
Great it worked, nothing wrong with an extra bit of oil!
Thanks
Dan
Liz Hardwick says
Out here on the West Coast of Canada we can't get self raising flour. Live a hour from the nearest town so buy my flour in 20kg bags - go shopping about every two months. Going to have to make up a batch of SR Flour just to try these naans, much quicker than the recipe I have been using. Also have a bread recipe that uses some old dough kept back at least 24 hours and it makes such a difference to the flavour.
Dan Toombs says
Thanks for your message, that is certainly dedication so hopefully the end result will be worth it. They are good!
Dan
Mark says
Yep, it really works! And I'm very demanding about my naans. Not quite up the best curry house standards but very good nonetheless, which I haven't come close to with any other recipe. It takes a keema filling very well, too. The dough (minus nigella seeds) also works extremely well asa pizza base. Scorch side one, flip over to just get a light skin on side two, then top and put under a hot grill.......
Dan Toombs says
Thanks very much for letting me know, all good to hear.
Dan
Tracy says
Hi Dan, could you tell me the best way to add the coconut etc to make the peshwari naan, thanks
Dan Toombs says
Just mix it into the dough.
Thanks
Dan
Susan Knight says
Loved your instant naan recipe, do simple to make. I've a dinner party for 8 people coming up and I prepare everything in advance, I don't want to be messing around with flour when my guests arrive. Question is can I keep these warm wrapped in foil in low oven for 20 minutes. If I have 6 or 8 wrapped together should I discard the top and bottom ones?
Dan Toombs says
They should be absolutely fine wrapped together in foil in a low oven for 20 minutes. Maybe put a little ghee on the top of each one.
Thanks
Dan
Tina says
Hi Dan,
Can you make these in advance and re-heat in an oven or air fryer?
Dan Toombs says
Yes, you couid definitely make them in advance. Just wrap them in cling film and heat when you’re ready.
Thanks
Dan
Terri says
Hi Dan,
I make these regularly and love them. Could you use this dough to make paratha.
Thanks in advance
Dan Toombs says
This wouldn’t work for parathas but I have a recipe on my blog for those . if you search it, you should easily find it.
Thank you
Dan
Sara says
Can you use gluten free flour to make them,,.?
Dan Toombs says
I haven’t tried but I don’t think that would work.
Thanks
Dan